Ergonomic solutions — standing tasks
A standing posture permits a greater range of vertical reach. The need for mobility is usually the reason for choosing this work position. Standing work has advantages related to mobility, less rear room requirements and greater latitude in workplace design. Standing work positions can be beneficial to the circulatory system. The standing position can improve posture, decrease muscle fatigue, reduce static pooling and reduce back pain.
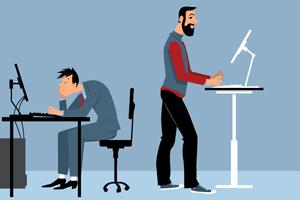
Proper body alignment while in a standing positions at a computer workstation.
When standing work is performed in front of a workstation it is recommended that the following be considered:
- There must be sufficient room for feet and knee mobility.
- Posture should be erect; a bent posture should not be needed to perform the task(s).
- Arm posture to perform task(s) should be mid-torso for best mechanical use of arms.
- Anti-fatigue mats should be used for prolonged standing task(s).
- Distribute body weight evenly to the front, back, and sides of the feet while standing
- Object handling tasks should be at or just below elbow height.
- Provide sit or stand stools to minimize the amount of loading on any one-muscle group. Placing one foot on a stool or footrest reduces the lumbosacral angle, thus reducing fatigue.
- Walking, lifting heavy materials, holding a telephone, and typing are all moving activities that require attention to ergonomics and posture. It is important to maintain good posture even while moving to avoid injury.
- If the worker must move along a line provide a padded work rail to lean against; the rail will relieve stress to the back and legs.
- Footrests should be 4 to 6 inches off the ground or platform. Again the rest will relieve strain on leg and back muscles.
- Avoid regularly wearing high-heeled shoes, which can affect the body’s center of gravity and change the alignment of the entire body, negatively affecting back support and posture.
- Foot activated controls should not be used for standing activities.
- Regular exercise such as walking, swimming, or bicycling will help the body stay aerobically conditioned, while specific strengthening exercises will help the muscles surrounding the back to stay strong. These benefits of exercise promote good posture which will, in turn, further help to condition muscles and prevent injury.
Note
When standing, muscles and good posture help to keep your spine in the balanced neutral position, abdominal muscles pull up in front and buttock muscles pull down in the back to maintain the spine in a natural position. This balance allows the workers to stand for long periods of time without developing significant back and leg fatigue.
This material is provided for informational purposes only and does not provide any coverage or guarantee loss prevention. The examples in this material are provided as hypothetical and for illustration purposes only. The Hanover Insurance Company and its affiliates and subsidiaries (“The Hanover”) specifically disclaim any warranty or representation that acceptance of any recommendations contained herein will make any premises, or operation safe or in compliance with any law or regulation. By providing this information to you, The Hanover does not assume (and specifically disclaims) any duty, undertaking or responsibility to you. The decision to accept or implement any recommendation(s) or advice contained in this material must be made by you.
LC JAN 2019 14-38
171-0918 (9/16)
Ergonomic solutions — standing tasks
A standing posture permits a greater range of vertical reach. The need for mobility is usually the reason for choosing this work position. Standing work has advantages related to mobility, less rear room requirements and greater latitude in workplace design. Standing work positions can be beneficial to the circulatory system. The standing position can improve posture, decrease muscle fatigue, reduce static pooling and reduce back pain.
Proper body alignment while in a standing positions at a computer workstation.
When standing work is performed in front of a workstation it is recommended that the following be considered:
- There must be sufficient room for feet and knee mobility.
- Posture should be erect; a bent posture should not be needed to perform the task(s).
- Arm posture to perform task(s) should be mid-torso for best mechanical use of arms.
- Anti-fatigue mats should be used for prolonged standing task(s).
- Distribute body weight evenly to the front, back, and sides of the feet while standing
- Object handling tasks should be at or just below elbow height.
- Provide sit or stand stools to minimize the amount of loading on any one-muscle group. Placing one foot on a stool or footrest reduces the lumbosacral angle, thus reducing fatigue.
- Walking, lifting heavy materials, holding a telephone, and typing are all moving activities that require attention to ergonomics and posture. It is important to maintain good posture even while moving to avoid injury.
- If the worker must move along a line provide a padded work rail to lean against; the rail will relieve stress to the back and legs.
- Footrests should be 4 to 6 inches off the ground or platform. Again the rest will relieve strain on leg and back muscles.
- Avoid regularly wearing high-heeled shoes, which can affect the body’s center of gravity and change the alignment of the entire body, negatively affecting back support and posture.
- Foot activated controls should not be used for standing activities.
- Regular exercise such as walking, swimming, or bicycling will help the body stay aerobically conditioned, while specific strengthening exercises will help the muscles surrounding the back to stay strong. These benefits of exercise promote good posture which will, in turn, further help to condition muscles and prevent injury.
Note
When standing, muscles and good posture help to keep your spine in the balanced neutral position, abdominal muscles pull up in front and buttock muscles pull down in the back to maintain the spine in a natural position. This balance allows the workers to stand for long periods of time without developing significant back and leg fatigue.
This material is provided for informational purposes only and does not provide any coverage or guarantee loss prevention. The examples in this material are provided as hypothetical and for illustration purposes only. The Hanover Insurance Company and its affiliates and subsidiaries (“The Hanover”) specifically disclaim any warranty or representation that acceptance of any recommendations contained herein will make any premises, or operation safe or in compliance with any law or regulation. By providing this information to you, The Hanover does not assume (and specifically disclaims) any duty, undertaking or responsibility to you. The decision to accept or implement any recommendation(s) or advice contained in this material must be made by you.
LC JAN 2019 14-38
171-0918 (9/16)